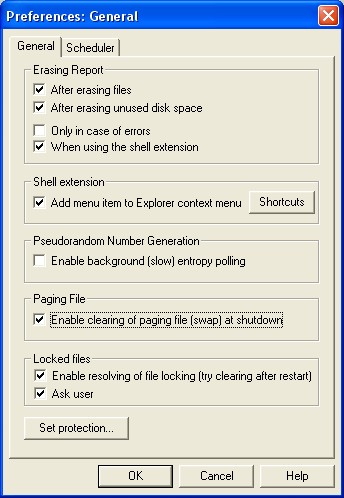
You may change the settings of the main Eraser application using the General Preferences window. You can access this window only from the main application.
As the Erasing Preferences window, this dialog box is also divided into two pages of which the first is for more general settings and the second is reserved solely for Scheduler preferences.

|
|
|
| You can select whether you want Eraser to display the erasing report after erasing files (and folders) or erasing unused disk space on a drive, or both. If you deselect both of these options, the Erasing Report will not be shown. If you want the Erasing Report to be shown only if errors have occurred (or the operation was terminated by the user), select the corresponding option. You can also disable the Erasing Report for the shell extension by deselecting "Erasing Report … When Using the Shell Extension".
|
|
|
| If you have entered both files (and folders) and unused space on one or more drives to the On-Demand list, the results shown in the Erasing Report are the combination of the selected items. For example, if you have only files on the list and have Erasing Report … After Erasing Unused Disk Space" selected, you will get no Erasing Report window after the operation.
|
|
|
| Eraser Launcher ignores the Erasing Report settings - it will show the results only if you specify the "-results" command line parameter.
|
|
|
| If you are using Windows NT and 2000, you can enable the clearing of the paging (swap) file at shutdown (this change does not take effect until you restart the computer and requires Administrator privileges to set). This is a Windows NT security feature and the overwriting is performed by the operating system, not by Eraser. Clearing the paging file means that after closing all applications and after writing unused data to the disk, Windows overwrites all available space on the paging file with zeros. Since the overwriting is done at shutdown, all possible sensitive data should be overwritten and the small number of areas that are still inaccessible at the moment are used only by the operating system. This option is not available when running on Windows 95, 98 or ME and is disabled if the user does not Administrator privileges on the system.
|
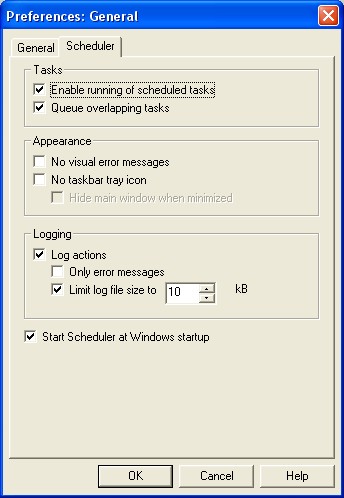
| On the second page you may set the preferences for the Scheduler user interface. These settings apply only for the Scheduler.
|

|
|
|
| You can set the Scheduler (and therefore, the whole main application) to start automatically as a taskbar tray application every time you start Windows by selecting the "Start Scheduler at Windows startup" option. If you do not want to add another icon to your taskbar tray, select "No taskbar tray icon" option. If you would still like to move Eraser to the background by minimizing the window, select "Hide main window on minimize". To restore the hidden instance of the application, start another copy of the program and the background process will take over.
|
|
|
| Scheduler also includes an option to log the occurred events into a file. This is useful for studying the success of operations afterwards. You can also set Scheduler to log only error messages and limit the size of the log file if you wish.
|
|
|
| Scheduler can run multiple tasks at a time - you can start several tasks and they will all be processed simultaneously. However, processing multiple tasks requires lots of system resources and the excessive disk activity can slow down the system considerable amount. If you select "Queue Overlapping Tasks" option, Scheduler will not run multiple tasks, but will instead queue new tasks to be processed one at a time after the process currently being run has finished. When this option is selected and a task is being processed, the "Run" menu command will add the selected task to the queue and "Stop" will remove a task from the queue.
|
|
|
| All visual error messages (dialog boxes) shown during the Scheduler operation will be dismissed in 15 seconds if no user intervention occurs, so you can safely leave the visual error messages enabled even when Scheduler is running for long times without supervision. However, the option to disable visual errors can be useful if you are an administrator of one or more computers with multiple users and do not want to confuse other users with possible error messages that may show up unexpectedly.
|
[